Showing posts with label pictorial. Show all posts

Wednesday, August 7, 2013

Pictorial: Intense Gold


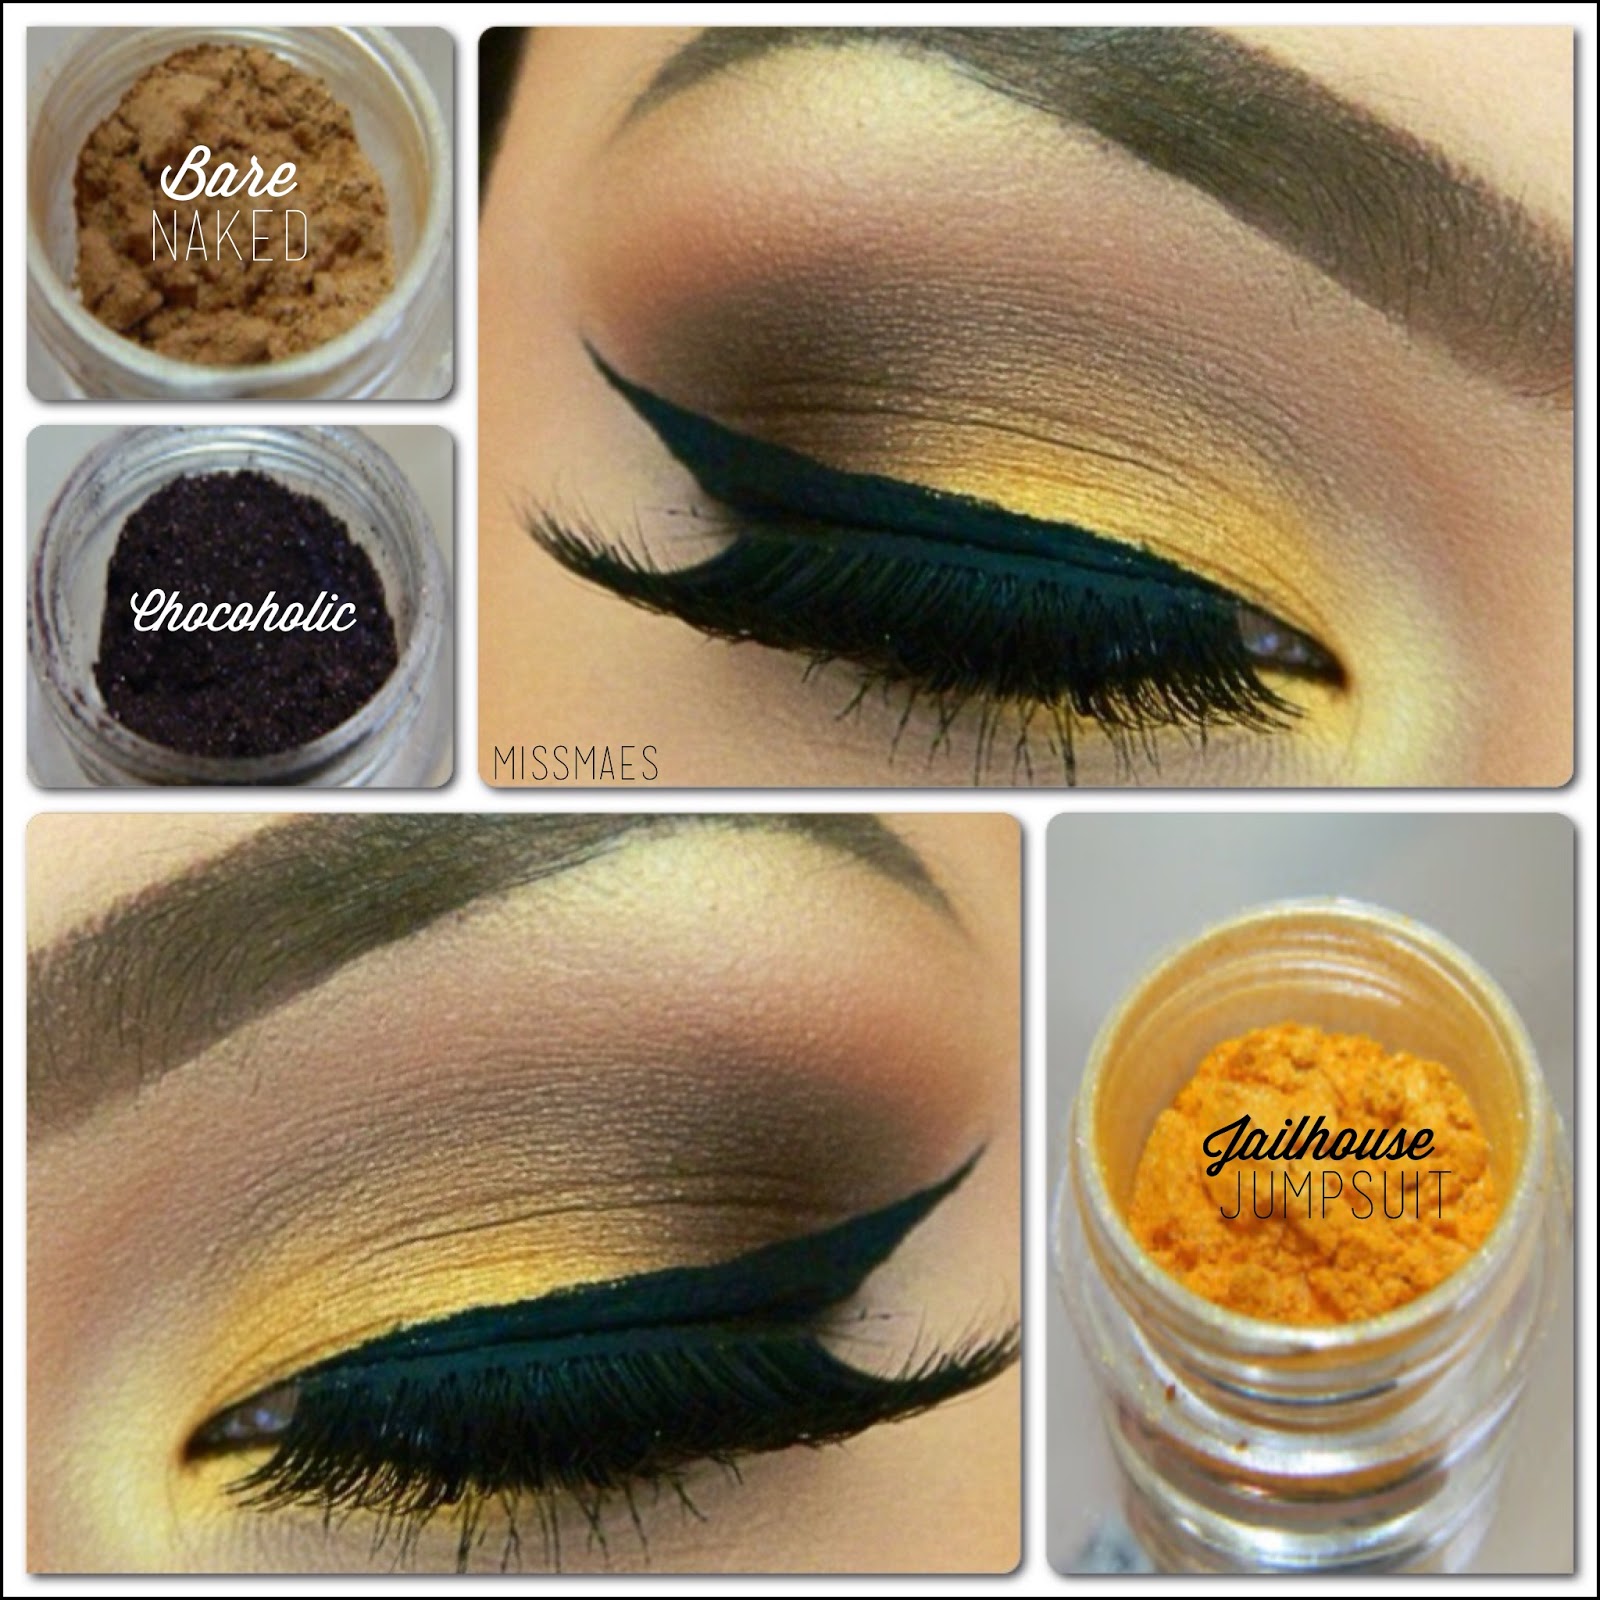
Golds are one of my all time favorite colors to wear! Glamour Dolls Eyes' (GDE) "Jailhouse Jumpsuit" is THE most intense and beautiful gold I have ever used. If you were to buy just one color from GDE, get Jailhouse Jumpsuit! I loved how this look turned out and glad I shot a pictorial for it so you can all re-create this.
Products Used:
Eyes:
Mac Painterly Paint Pot
Glamour Doll Eyes pigments: "Jailhouse Jumpsuit," "Bare Naked," & "Chocoholic" 
Mac "Texture" e/s
NYC Liquid Eyeliner
 Urban Decay 24/7 Glide-on eye pencil "Perversion" 
Maybelline Falsies Big Eyes mascara
Oh My, Lash "The Lucille"

Brows:
Anastasia Beverly Hills Brow Powder Duo "Dark Brown"
ABH Clear Brow Gel

Brushes:
Makeup Addiction "The Blender"
Makeup Addiction "The Shader"
Makeup Addiction "The Detailer"
Mac 217


Please click below to read the steps!

Friday, July 26, 2013

Pictorial & FOTD: Mac Illustrated Face Kit by Rebecca Moses


Face, eyes, and lips using Mac Illustrated Face Kit! I did not have time to take a full face shot using my camera or my phone so I took a screen shot of the video I posted on Instagram earlier today. (I was running late to an appointment!) I also made a pictorial for the look! It is super basic and easy to do!

I wanted to post my thoughts of each component in the kit now that I tried all of them. Let's begin with the eye shadows. "Orb" applies extremely on my skin. Orb is good to diffuse color and harsh lines on the crease. "All That Glitters" shows up sheer, so the best way to use this color is with a damp brush or to spray Fix+ on the brush for better pigmentation. I thought "Smoked Sepia" and "Showstopper" were a disappointment. The colors look and swatched beautifully but I had a hard time working with both colors. "Smoked Sepia" was difficult to blend and I didn't like the formula. I was expecting a chestnut brown and I didn't get that. I thought "Showstopper" would be very dark. I love dark matte browns. Again, the pigmentation is not the greatest. If I were to do a smokey eye, I would have a hard time with it, going back to the color multiple, multiple times to achieve the desired look.


 Click below to read the step by step!

Monday, June 24, 2013

Urban Decay Naked Palette Pictorial


I would really like my blog to be focused on makeup pictorials and I have done so many on my Instagram, before I even started my blog. So, I decided to post some of my past pictorials on here. The steps are copied from what I originally written out on IG, so I do not have a list of all the products I used, but will include what I can remember. I will be slowly  adding previous pictorials soon!


Products Used:
Eyes:
Urban Decay Eye Primer Potion
Urban Decay Naked Palette 
NYC Liquid Eyeliner
Urban Decay's 24/7 Glide-on Eye Pencil in Perversion
Select Lash S47 & S1 

Brows:
Benefit Brow Zings
Mac "Brun" e/s
Mac 266 Brush
Urban Brow setting gel

Please click below to read the steps!

Friday, June 14, 2013

Catwalk Eye Shadow Palette Pictorial

I recently received Anastasia Beverly Hills' NEW Catwalk Eye Shadow Palette. My first impressions about the palette was the beautiful warm colors. I gravitate towards warm tones, so I knew I was going to love it! It comes with 10 eye shadows with both shimmery and matte colors. I actually think this is a must have palette. I love how it is versatile, so you can create neutral and smokey eye looks, blendability is great, and it is a reasonable price ($29). This palette is available at www.anastasia.net and at Ulta in July!
Products Used:
Eyes:
Urban Decay Eye Primer Potion
Anastasia Beverly Hills Catwalk Eye Shadow Palette
Maybelline Eye Studio Gel Liner
Maybelline The Falsies Big Eyes Mascara
Rimmel Scandal Eyes eye liner "Nude"
Select Lash S47 & S1

Brows:
Anastasia Beverly Hills Brow Powder Duo "Dark Brown"
ABH Clear Brow Gel

Brushes:
Mac 224
Mac 217
Mac 210
Sigma E30
Makeup Addiction "The Shader"
Please click below to read the full steps!

Wednesday, June 12, 2013

Glamour Doll Eyes: Smokey Green Pictorial

I am so happy I finally found the most perfect dark, forest green! I have been wanting this shade of green for a long time! I used "Martini Olive" from Glamour Doll Eyes. Scroll down to see the products used and pictorial! 
Products Used:
Eyes:
Urban Decay Eye Primer Potion
Glamour Doll Eyes: "Martini Olive"
Glamour Doll Eyes: "Bare Naked"
Glamour Doll Eyes: "Chocoholic"
Mac "Red Brick"
Maybelline Eye Studio Gel Liner
Rimmel Scandal Eyes Eyeliner "Naked"
Maybeline The Falsies Big Eye Mascara
Select Lash S47 & S1 

Brushes:
Makeup Addiction "The Shader"
Makeup Addiction "The Blender"
Makeup Addiction "The Detailer"
Mac 217
Mac 210

Click below to read detailed steps!

Wednesday, June 5, 2013

Urban Decay Naked 2 Palette Pictorial


Products Used:

Eyes:
Urban Decay (UD) Eye Primer Potion
UD Naked 2 Palette: (Foxy, Half Baked, Bootycall, Tease, Snakebite, Busted, Blackout)
UD 24/7 Glide-On Eye Shadow Pencil “Midnight Cowboy”
Maybelline Eye Studio Gel Liner
UD 24/7 Glide-On Eye Pencil “Perversion”
Maybelline The Falsies Big Eyes mascara
Ardell lashes #113

Brushes:
Sigma E40
Mac 217
Makeup Addiction “The Shader” brush
Makeup Addiction “The Blender” brush
Makeup Addiction “The Detailer” brush 
Makeup Addiction "The Highlighter" brush


Click below to see the detailed steps!

Saturday, June 1, 2013

Urban Decay Vice Palette "Chaos" Pictorial

Hey beauties,

One of my followers requested a pictorial for one of my older looks I posted a while ago on Instagram, so I tried my best to re-create the look! I used the color "Chaos" from UD's Vice Palette. I used Chaos alone because it is such a beautiful blue, I wanted to highlight the color!


Step 1: Apply eye primer all over the lid and brow bone. I use UD's Eye Primer Potion. With a Mac 217 brush, blend "Laced" on to the crease.

Step 2: Pack "Chaos" on to the lid using UD's Shadow brush. Apply the color below the crease because we will blend the color.

Step 3: Take the 217 brush, and diffuse "Chaos," following the natural fold of the eye. Although "Chaos" is a gorgeous color, I find it hard to work with. You will need to re-apply the color on the lid because it tends to disappear as you blend it out to the crease.

Step 4: Line the lower lash line with a Sigma E30 brush.

Step 5: Line the waterline with UD 24/7 Glide-On eye pencil "Perversion." With a Mac 227 brush, apply "Anonymous" all over the brow bone. Then highlight the inner tear duct with "Echo Beach."

Step 6: Apply mascara and your favorite lashes! I use Benefit's They're Real mascara and Select Lash S1 & S47 lashes stacked.


Friday, May 24, 2013

Pop of Color with Hypercolor

Pop of color with Anastasia Beverly Hills Hypercolor! I've added Hypercolor Brow & Hair Powder to my lower lash line. The color I used for this look is "Teal Tornado." I love how versatile the product is! Scroll below for products listed and steps. 


Products Used: 
Eyes:
Urban Decay Eye Primer Potion
Mac "Red Brick" e/s
Mac "Ricepaper" e/s
Mac "Brun" e/s
Anastasia Beverly Hills Hypercolor Brow & Hair Powder "Teal Tornado"
Maybelline Eyestudio Gel Liner
Urban Decay 24/7 Glide-on Eye pencil "Perversion"
Cover Girl Lash Blast mascara
Select Lash S1 & S47

Brows:
Anastasia Beverly Hills (ABH) Brow Wiz "Brunette"
ABH Brow Powder Duo "Dark Brown"

Brushes:
Makeup Addiction "The Shader"
Makeup Addiction "The Blender"
Sigma E40
Mac 210

Click below to see the detail steps!

Tuesday, May 21, 2013

Smoked Out Red Brick Pictorial

Mac's "Red Brick" is one of my staple colors, instantly adding warmth to any look. I usually use it in my crease, but decided to do something different and apply it on the lid. Red Brick is a reddish-orange matte color, easy to work with, and highly pigmented. Best of all, I love that it is buildable, so you can make it as intense and bright as you want, or something light and neutral. Scroll down to see the products used and pictorial!


Products Used:
Eyes:
Urban Decay Eye Primer Potion
Mac "Red Brick" e/s
Mac "Texture" e/s
Mac "Folie" e/s
Mac "Brun" e/s
Mac "Ricepaper" e/s
Maybelline Eyestudio Gel Liner
NYX Jumbo Eye Pencil "Milk"
Urban Decay Super Curling Mascara
Select Lash S47

Brows:
Anastasia Beverly Hills (ABH) Brow Wiz "Brunette"
ABH Brow Powder Duo "Dark Brown"
ABH Clear Brow Gel

Brushes:
Makeup Addiction "The Shader" 
Makeup Addiction "The Detailer" 
Mac 217
Mac 210
Sigma E40
Sigma E30
Sigma E15

Click below to read the detailed steps!

Wednesday, May 15, 2013

My go-to look w/ Urban Decay's Basics Palette! W/ steps!

Urban Decay's Naked Basics palette has been my go-to palette lately, when I do not have time to do a fancy look or too lazy to think about colors. I wanted to add more warmth to the look, so I added Mac's "Soft Brown" to the crease. It is so quick and effortless! I did not make a step-by-step pictorial for this, but I did add labels. Scroll down to read the products listed and steps!


Products Used:
Eyes:
Urban Decay Eye Primer Potion
Urban Decay Naked Basics palette
Mac "Soft Brown" e/s
Maybelline Eyestudio Gel Liner 
Urban Decay 24/7 Glide-On Eye Pencil "Perversion"
Urban Decay Super Curling mascara
Ardell Wispies lashes

Brows:
Anastasia Beverly Hills (ABH) Brow Wiz
ABH Brow Powder Duo "Dark Brown"
ABH Clear Brow Gel

Brushes:
Sigma E40
Mac 217
Makeup Addiction: The Shader, The Detailer
Mac 210

Click below to read the detailed steps!

Tuesday, May 14, 2013

Pinks & Purple Makeup Pictorial

Pink & purple dedicated to my mama! She loves pinks, purples, and lavenders, it was appropriate to wear on Mother's Day =) Continue below to see all of the products I used to achieve this look and pictorial with each steps!


Products Used:
Eyes:
Urban Decay Eye Primer Potion
Mac e/s "Early  Bird" (discontinued)
NYX Jumbo Eye Pencil "Milk"
Urban Decay e/s "Hot Pants"
Mac Extra Dimension e/s "Stylishly Merry" (discontinued) 
Mac e/s "Brun"
Urban Decay e/s "ABC Gum"
Mac Select Cover-up Concealer
Urban Decay 24/7 Glide-On Shadow Pencil "Delinquent"
Maybelline Eyestudio Gel liner "Black"
Urban Decay Super Curling Mascara
Ardell Wispies lashes

Brows:
Anastasia Beverly Hills (ABH) Brow Wiz 
ABH Brow Powder Duo "Dark Brown"
ABH Clear Brow Gel

Brushes:
Mac 217 
Sigma E40 


Step 1: Apply Urban Decay Eye Primer Potion all over the lid and brow bone.Take a blending brush, I use Makeup Addiction's The Blender and apply Mac's "Early Bird" on the crease, sweeping the color back and forth.

Step 2: Take NYX Jumbo Eye Pencil in "Milk" and place it all over the lid.

Step 3: Apply Mac's "Brun" on the outer corner with a Mac 217 brush, blending it up to the middle. 

Step 4: Pack on Urban Decay's "Hot Pants" on the inner lid. Followed by Mac's Extra Dimension "Stylishly Merry" on the rest of the lid. I used Makeup Addiction's The Shader to pack on e/s. 

Step 5: I did several things in this step: 1) Cleaned underneath the eye with Mac Select Cover-up Concealer 2) Added more "Stylishly Merry" on the lid, to make it appear more vibrant 3) Further darkened the outer corner with Mac's Brun and 217 brush 4) Diffused the color on the crease with Sigma E40 brush to make it more blended (I always use this brush to further diffuse and blend colors on the crease) 5) Applied Urban Decay's "ABC Gum" on the brow bone 

Step 6: Line the lower lash line and waterline with Urban Decay 24/7 Glide-On Shadow Pencil "Delinquent"(Love this eyeliner! Best purple eyeliner ever!)

Step 7: Apply eyeliner. I use Maybelline's Eyestudio Gel liner "Black" and Makeup Addiction's The Liner brush.

Step 8: Lastly, apply mascara and lashes. I use Urban Decay Super Curling Mascara and Ardell Wispies lashes.